Tuesday, November 8, 2016

Script for Detach and Attach Web Application Content DBs

Get Web App Db’s:

Get-SPContentDatabase -WebApplication http://demo.Test.com | select -expand name |out-file "d:\sp\sp patching\dbinfo\demo.txt"

Remove Web App Db’s:

Get-SPContentDatabase -WebApplication http://demo.Test.com | Dismount-SPContentDatabase

Add Db’s to Web App:

$dbs = @(Get-Content -path "d:\sp\sp patching\dbinfo\tpm.txt" )
For ($ii=0; $ii -le $dbs.Length - 1;$ii++)
{
               Mount-SPContentDatabase -Name $dbs[$ii] -WebApplication http://demo.Test.com
}

Wednesday, July 27, 2016

Sample Codes

Creating Sharepoint site columns, Content type, and List in App model(Sharepoint Hosted).

Steps :
1. Open visual studio and Create Sharepoint hosted App.
2. Creating List Columns.
3.Creating Content type.
4, Creating List using existing content type.5.Deploying

Source code: Click here to down

Thursday, July 14, 2016

Java Script Tools


JavaScript Tool for Visual Studio 

web Essentials : 

https://visualstudiogallery.msdn.microsoft.com/56633663-6799-41d7-9df7-0f2a504ca361

JavaScript Parser For Visual Studio 

https://visualstudiogallery.msdn.microsoft.com/288a2b0f-1357-47b4-8215-1134c36bdf30

LSLint for Visal Studio

https://visualstudiogallery.msdn.microsoft.com/ede12aa8-0f80-4e6f-b15c-7a8b3499370e


Json Tool

http://jsonviewer.codeplex.com/

Browser Tool : 

Firebug,IE,&Chrome 

http://www.dotnetmafia.com/blogs/dotnettipoftheday/archive/2014/02/26/useful-javascript-for-working-with-sharepoint-display-templates-spc3000-spc14.aspx


JavaScript resouce : 


https://msdn.microsoft.com/en-us/library/fp179912.aspx


Sharepoint Javascript files : 

Out of box java script file 

Core.js
Menu.js
Callout.js
Sharing.js
SuitLinks.js
Init.js
Sp.js


Variables :

_spPageContextInfo 

Culture/Locale information
Server-relative URL for site
Absolute URL for Site
Current page relative URL
Pages ListID
Web Title
Web UI Version


REST API

SharePoint 2010 

/_vti_bin/listData.svc

SharePoint 2013 

Listdata.svc is deprecated.

still available for backwards compatibility

RESTful  operations added to /_vti_bin/Client.svc
/_api added as an alias for /_vti_bin/Client.svc


Saturday, June 4, 2016

SharePoint 2013 Service Application creation

SharePoint 2013: Service Applications Guide


Table of Contents

SharePoint 2013: Service Accounts

Table of Contents


Ref : http://social.technet.microsoft.com/wiki/contents/articles/14500.sharepoint-2013-service-accounts.aspx#SPProf


  • SQL Server Accounts
    • SQL Admin
    • SQL Service
  • SharePoint Server Accounts
    • SP Admin
    • SP Farm
    • SP Web Application
    • SP Services
    • SP C2WTS
    • SP Cache Super User
    • SP Cache Super Reader
    • SP Excel User
    • SP Visio User
    • SP PerformancePoint User
    • SP Profile
    • SP Profile Sync
    • SP Search Crawl
  • Project Server Accounts and Groups
    • PS Project
    • PS Workflow Proxy
    • PS Project Report
    • PS Project Report Authors
    • PS Project Report Viewers
    • PS Project External Report Viewers

Friday, March 4, 2016

Replicating Directory changes

This guide is a step by step guide with Screenshots to give the “Replicating Directory changes” rights to the SharePoint user profile account that will be used to synchronize the user profiles.The screenshots were taken in Windows Server 2012, however the steps are identical or  very similar in Windows Server 2008 and 2008 R2. 

The Guide

In Active Directory Users and Computers, right-click the domain, and then click Delegate Control.
On the first page of the Delegation of Control Wizard, click next.
On the Users or Groups page, click Add.
Type the name of the synchronization account, and then click OK.
Click Next.
On the Tasks to Delegate page, select create a custom task to delegate, and then click Next.
On the Active Directory Object Type page, select this folder, existing objects in this folder, and creation of new objects in this folder, and then click next.
On the Permissions page, in the Permissions box, select Replicating Directory and then click Next.
Click Finish.


Source :https://absolute-sharepoint.com/2012/12/step-by-step-guide-to-configure-the-replicating-directory-changes-for-sharepoint-2010-and-2013.html
 

Wednesday, January 27, 2016

Renaming the SharePoint Admin Content Database to Follow SQL Server Naming Conventions

Solution
In a previous tip, Introduction to SharePoint 2010 for SQL Server DBAs, you were introduced to the different types of databases that SharePoint uses. The SharePoint Central Admin database is a configuration database that stores site content and permissions for the Central Administration web application. As a DBA, we are concerned with backing up and restoring all of the SharePoint databases. While the Central Admin Content database is backed up when a SharePoint farm administrator performs a farm configuration backup, it doesn't get restored when a farm is restored. We can backup and restore the SharePoint Admin Content database separately using native SQL Server backup tools. The challenge here is dealing with a database name that has a GUID value.
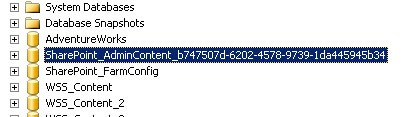
Here is an example of the SharePoint database name.
 
the SharePoint Admin Content database
If you have a corporate policy to standardize database naming conventions or use custom database maintenance scripts, it is imperative to rename the SharePoint databases to eliminate those GUID values, starting with the SharePoint Admin Content. While most recommendations will tell you to rename your SharePoint databases accordingly during creation, in most cases, we DBAs are not included as part of the initial planning and deployment process. Thus, we end up with SharePoint databases with such naming conventions. To accomplish this task, we will be using Windows PowerShell via the SharePoint 2010 Management Shell console. Remember to backup the database prior to performing the tasks below.
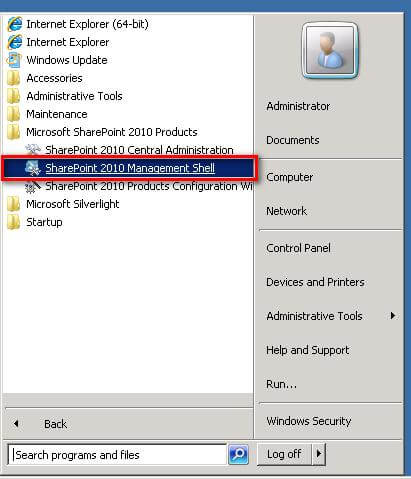
  1. On the SharePoint web or application server, click Start, point to All Programs, and then click Microsoft SharePoint 2010 Products. In the list of available options, click SharePoint 2010 Management Shell.

    the SharePoint 2010 Management Shell
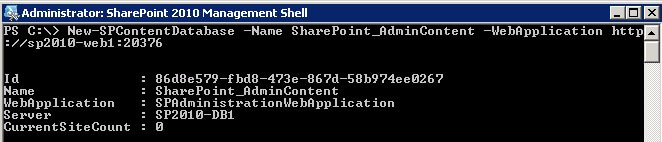
  2. In the SharePoint 2010 Management Shell, type the following command to create a new content database named SharePoint_AdminContent. This will replace the existing Central Admin content database that has a GUID value in its name. In my environment, the web application name for the SharePoint Central Administration web application is http://sp2010-web1:20376. The New-SPContentDatabase PowerShell cmdlet is described further in this tip on Managing SharePoint Content Databases with PowerShell.

    PS C:\> New-SPContentDatabase -Name SharePoint_AdminContent -WebApplication http://sp2010-web1:20376

    SharePoint_AdminContent.
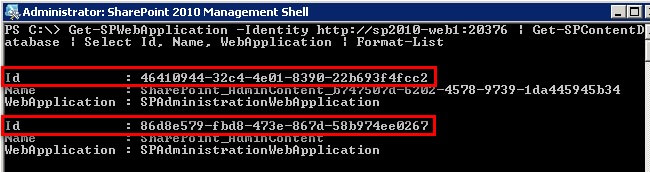
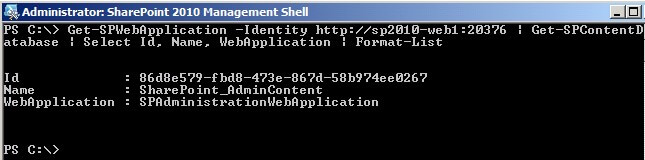
  3. We need to retrieve the Id values assigned to the SharePoint Admin Content databases. Run the following command, using the Get-SPWebApplication and the Get-SPContentDatabase PowerShell cmdlets.

    PS C:\> Get-SPWebApplication -Identity http://sp2010-web1:20376 | Get-SPContentDatabase | Select Id, Name, WebApplication | Format-List

    the SharePoint Admin Content databases
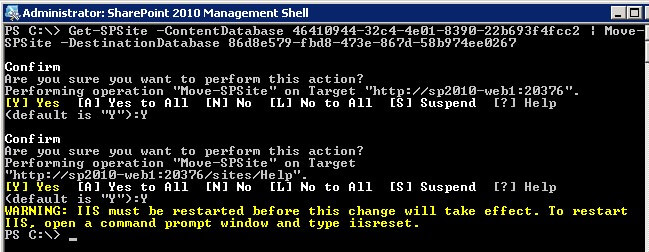
  4. To move the contents of the SharePoint Admin Content database from the one with the GUID value to the newly created one, run the following command, using the Get-SPSite and the Move-SPSite PowerShell cmdlets. Note that the you should pass the Id property values of the databases names instead of the Name property for the -ContentDatabase parameter of the Get-SPSite cmdlet. Type Y to confirm the prompts.

    PS C:\> Get-SPSite -ContentDatabase 46410944-32c4-4e01-8390-22b693f4fcc2 | Move-SPSite -DestinationDatabase 86d8e579-fbd8-473e-867d-58b974ee0267

    run the following command,
  5. Run IISRESET to restart IIS on the web front end server.
  6. Verify that the SharePoint Central Administration web application renders properly without issues. Try navigating thru the different links to make sure that everything is working fine.
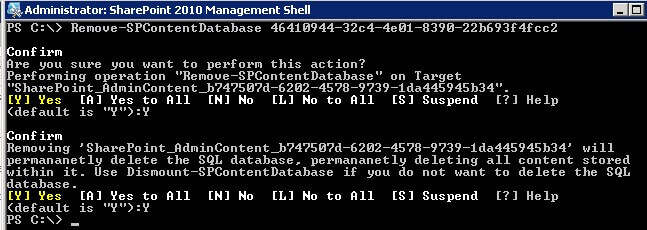
  7. To completely remove the GUID-valued SharePoint Admin Content database, run the following command, using the Remove-SPContentDatabase cmdlet. This will detach the content database from the SharePoint Central Administration web application and eventually deleting it from the SQL Server instance. Type Y to confirm the prompts.

    PS C:\> Remove-SPContentDatabase 46410944-32c4-4e01-8390-22b693f4fcc2

    Run IISRESET to restart IIS on the web front end server
  8. Verify that you no longer have the GUID-valued GUID-valued SharePoint Admin Content database and that it is now using the newly created database

    PS C:\> Get-SPWebApplication -Identity http://sp2010-web1:20376 | Get-SPContentDatabase | Select Id, Name, WebApplication | Format-List

    Verify that you no longer have the GUID-valued GUID-valued SharePoint Admin Content database
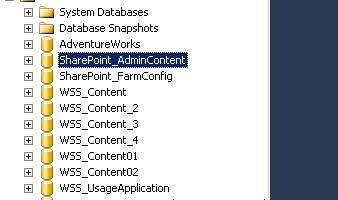
    You can also confirm this by checking the list of databases from within SQL Server Management Studio.
    You can also confirm this by checking the list of databases from within SQL Server Management Studio.
In this tip, we've renamed an existing GUID-valued SharePoint content database to remove the GUID value. In future tips, we will look at performing the same task but with the service application databases running on your SharePoint 2010 farm.


Source article : https://www.mssqltips.com/sqlservertip/2706/renaming-the-sharepoint-admin-content-database-to-follow-sql-server-naming-conventions/
 

Tuesday, October 27, 2015

Visio Service: the server failed to process the request

A user reports the following error when attempting to view a Visio web drawing file .
Open SharePoint Central Admin


PowerShell: First, look in the Service Applications list for the name of your Visio Service. Then execute this script to generate a list of service applications and their associated application pools:

Get-SPServiceApplication -Name "{Your Visio Service name}"

Note down the application pool associated with the Visio Graphics Service.  Then execute this script to see a list of application pools and their service accounts:

Get-SPServiceApplicationPool -Identity "{Your Application Pool Name}"


Provide SpdataAccess Role to App Pool Account on corresponding Content Database
server.


Step1 : Get the site collection Content database name
Step2 : Open SQL server ---> Select App Pool User ----> Properties---->User Mapping--->Select Content Database---->Select "SPdataAccess"


Ref :
http://alstechtips.blogspot.com/2014/05/sharepoint-2013-visio-service-server.html

Wednesday, May 6, 2015

Hide page elements from the SharePoint dialog box


By default, anything you add in your custom SharePoint master page will not only appear in the web interface, but will be passed through and appear in the pop-up dialog box that is used for so many functions in SharePoint 2010. Microsoft recommends adding the s4-notdlg CSS class to any HTML element that you don’t want to appear in the dialog box.  So for example


<div id="MyCustomElement" class="s4-notdlg">
   Wonderful goodness
</div>


This works fine but it can get rather cumbersome to add this class to every element you want to stop from being passed through.  I suggest that you take a different approach. When you view the source code for a dialog box, the HTML element nested in the iFrame that creates the dialog box has the ms-dialog class applied.


<div class="ms-dlgFrameContainer">
  <iframe id="DlgFramee" class="ms-dlgFrame" frameborder="0" src="http://sharepoint">
    <html class="ms-dialog">
      <head>


Create a CSS style statement that uses a descendent selector identifier. Set the ms-dialog class as a parent and your custom identifier as the child. Set the display to none.


.ms-dialog #MyCustomElement {
   display:none;
}


Each time you create a new element that needs to be hidden from the dialog box display, you just need to update your CSS style statement.  There is no need to add an additional style to the HTML element in the master page/content page/page layout file.


.ms-dialog #MyCustomElement,
.ms-dialog .Header,
.ms-dialog .Footer  {
   display:none;
}


This same approach can be used for altering the display of an element in the dialog box.  Use the same descendent selector and change up the properties.


.Header {
   background: red;
}


Source : http://blog.sharepointexperience.com/2011/09/hide-page-elements-sharepoint-dialog-box/


SharePoint 2013 Custom Master Page Apps not Loading

Design Manger Bug :


Ran into an interesting little bug this past week with SharePoint 2013 Design Manager master pages. After having a friend recreate the issue on her VM, I contacted the Microsoft product team and confirmed this is an issue they hope to solve with a future update. Essentially, if you create a master page with the Design Manager, whether a minimal master or one that has been converted from HTML and CSS, the Site Contents > Add an app page will not allow you to add apps or lists to your site. This issue also impact the out of the box Oslo master page. Here is what you should see when you go to the Add an App page:


image
With this bug you end up never seeing the Apps you can add section. Sometimes you will see the “Working on it…” message and other times you will just see the Noteworthy apps.
The key to fixing this problem is to make sure your master page includes: DeltaPlaceHolderLeftNavBar, PlaceHolderLeftNavBar, DeltaPlaceHolderPageTitleInTitleArea, and PlaceHolderPageTitleInTitleArea and that each of them is not set to Visible=False. To do this in an HTML master page with Design Manager you would add the following snippets:

<!--SPM:<SharePoint:AjaxDelta id="DeltaPlaceHolderLeftNavBar" BlockElement="true" runat="server">-->
<!--SPM:<asp:ContentPlaceHolder id="PlaceHolderLeftNavBar" runat="server">-->
<!--SPM:</asp:ContentPlaceHolder>-->
<!--SPM:</SharePoint:AjaxDelta>-->
<!--SPM:<SharePoint:AjaxDelta id="DeltaPlaceHolderPageTitleInTitleArea" runat="server">-->
<!--SPM:<asp:ContentPlaceHolder id="PlaceHolderPageTitleInTitleArea" runat="server">-->
<!--SPM:</asp:ContentPlaceHolder>-->
<!--SPM:</SharePoint:AjaxDelta>-->


With these lines in place, the Apps you can add should show up again. Note, if you aren’t making a Design Manager HTML master page you will still want to ensure these controls (without the DM comments) are included somewhere in your master page and not marked as Visible=False.


Org Article : http://blog.drisgill.com/2012/12/design-manager-bug-sharepoint-2013-rtm.html


Monday, May 4, 2015

Small Calender In Sharepoint 2013

Out put :


SharePoint 2013 Small Calendar:
   
image


Step1 :


Add Calendar webpart
Add Content editor webpart
Add the below CSS .


2013 Content Editor Web Part CSS: <style>
/**** Small Calendar ***/
.ms-acal-item{height: 10px !important;}
.ms-acal-sdiv,
.ms-acal-mdiv,
.ms-acal-ctrlitem,
.ms-acal-month-weeksel,
.ms-acal-title,
.ms-acal-month-top span{display: none;}
.ms-acal-summary-itemrow TD DIV{height: 15px !important;}
</style>


Ref : http://erikswenson.blogspot.com/2013/04/small-calendar-for-sharepoint-2010-2013.html


Thursday, March 5, 2015

Manage the Distributed Cache in SharePoint 2013

  • When SharePoint Server 2013 is installed, it assigns the Distributed Cache service 10% of the total physical memory on the server. The Distributed Cache service uses half of that memory allocation for data storage (also known as cache size, 5% cache size), and the other half of that memory allocation is used for memory management overhead. When the cached data grows, the Distributed Cache service uses the entire 10 percent of the allocated memory. In most cases, initial 5% cache size may not be enough and you may require to increase cache size to support various SharePoint features. e.g. when you install SharePoint 2013 on 8 GB RAM (8192 MB RAM), it would allocate 410 MB (5% of 8GB RAM) to the Distributed Cache size. This may not be enough to support 50 concurrent user’s My Site activities and it may require to increase the Distributed Cache size

MetricSmall FarmMedium FarmLarge Farm
Number of usersLess than 10KLess than 100KLess than 500K
Cache size1GB2.5GB12GB
Memory allocation2GB5GB24GB
ConfigurationCollocated or dedicatedDedicatedDedicated

Following commands are used to manage the Distributed cache in SharePoint 2013.

$instanceName ="SPDistributedCacheService Name=AppFabricCachingService"
$serviceInstance = Get-SPServiceInstance | ? {($_.service.tostring()) -eq $instanceName -and ($_.server.name) -eq $env:computername}
$serviceInstance.Provision()


$instanceName ="SPDistributedCacheService Name=AppFabricCachingService"
$serviceInstance = Get-SPServiceInstance | ? {($_.service.tostring()) -eq $instanceName -and ($_.server.name) -eq $env:computername}
$serviceInstance.Unprovision()


Update-SPDistributedCacheSize -CacheSizeInMB CacheSize 


$farm = Get-SPFarm
$cacheService = $farm.Services | where {$_.Name -eq "AppFabricCachingService"}
$accnt = Get-SPManagedAccount -Identity d
omain_name\user_name
$cacheService.ProcessIdentity.CurrentIdentityType = "SpecificUser"
$cacheService.ProcessIdentity.ManagedAccount = $accnt
$cacheService.ProcessIdentity.Update() 
$cacheService.ProcessIdentity.Deploy()

Use-CacheCluster      :


Distributed cache use this command to enable cache administration via PowerShell

Get-CacheHost 

Use this command to determine the status of the cache service on each server in the cluster. You should get a listing of every server as well as the state of the service on that server.


Get-CacheHostConfig <HostName> <Port>


Use this command to get general configuration details about a specific host in the cache cluster. All Windows Server AppFabric cache hosts use TCP/IP to communicate with each other and support the cache cluster. The SharePoint distributed cache is an AppFabric cache behind the scenes and it uses the default AppFabric ports for server to server communication. These ports should be allowed through your firewalls for the cache service to function correctly.


Get-CacheAllowedClientAccounts
This command will tell you which accounts/groups have rights to connect to the cache cluster as clients. This seems to be the standard configuration in SharePoint 2013.


Get-Cache

Gets a listing of all the default caches in the farm. All caches have the Id (Guid) of the farm appended to the name.


Get-CacheConfig <CacheName>

Get details about a specific cache instance


Restart-CacheCluster

Restarts the distributed cache service on all servers in the cluster. It will also clear the contents of the cache.


Stop-SPDistributedCacheServiceInstance -Graceful

Stop the distributed cache service on an individual machine. The Graceful parameter will allow the cache service to migrate cached items to another host.

Remove-SPDistributedCacheServiceInstance

Removes a cache host from the cluster. It’s always a good idea to stop the cache service before you remove it.

Add-SPDistributedCacheServiceInstance

Adds a cache host back to the cluster. If there is more than one host in the cluster, it will take a few minutes for the service to start and for any cached items to be synchronized to the new host.


Error and solution URLS : 

http://netwovenblogs.com/2014/03/11/the-newsfeed-is-not-working-on-mysite-in-sharepoint-2013/

Ref Sites : 

http://almondlabs.com/blog/manage-the-distributed-cache/


Monday, February 2, 2015

Search Service Application creation using Powershell


# Getting  Search Application from Each Server.

$AppServer = get-SPServiceInstance -server VSPIAPP | ?{$_.TypeName -eq "SharePoint Server Search"}
$WEFServer = get-SPServiceInstance -server VSPIWEF | ?{$_.TypeName -eq "SharePoint Server Search"}

#Start our services

Start-SPEnterpriseSearchServiceInstance -Identity $AppServer
Start-SPEnterpriseSearchServiceInstance -Identity $WEFServer

#Create our App Pools

$acct = get-spmanagedaccount "abc\SerchSerivceSVC"
$Admin = new-SPServiceApplicationPool -name "Search_Admin_Pool" -account $Acct
$Query = new-SPServiceApplicationPool -name "Search_Query_Pool" -account $Acct


#Create the Search Service Application

$SA = New-SPEnterpriseSearchServiceApplication -Name "IP Search Service Application" -applicationpool $Admin -databasename "<<Database_Name>>"


#Create the proxy and associate it

$SProxy = new-spenterprisesearchserviceapplicationproxy -name "IP Search Service Application Proxy" -SearchApplication $SA


#Get a clone to work with
$ST = $SA.ActiveTopology.Clone()

#Input each component of the topology into our clone


New-SPEnterpriseSearchAdminComponent -SearchServiceInstance $AppServer -SearchTopology $ST

New-SPEnterpriseSearchContentProcessingComponent -SearchServiceInstance $AppServer -SearchTopology $ST

New-SPEnterpriseSearchAnalyticsProcessingComponent -SearchServiceInstance $AppServer -SearchTopology $ST

New-SPEnterpriseSearchCrawlComponent -SearchServiceInstance $AppServer -SearchTopology $ST


New-SPEnterpriseSearchIndexComponent -SearchServiceInstance $WEFServer -SearchTopology $ST

New-SPEnterpriseSearchQueryProcessingComponent -SearchServiceInstance $WEFServer -SearchTopology $ST

$ST.Activate()


$username = read-host "User name"
$password = read-host -assecurestring  "Password"


Set-SPEnterpriseSearchServiceApplication –Identity $SA -ApplicationPool $Query -DefaultContentAccessAccountName $UserName -DefaultContentAccessAccountPassword $Password.

Friday, January 9, 2015

Using the Synchronization Service in SharePoint 2010 – Forefront Identity Manager 2010/2013

If you use the User Profile Synchronization Service in SharePoint 2010/2013, you may not realise that you are also getting an identity management product included – Forefront Identity Manager 2010/2013 (or FIM 2010). FIM 2010 is a full-featured identity management system, and included with SharePoint 2010 is the basic version that does not have a lot of the “extras” (like Certificate Management, the FIM portal, etc) but is used to import and export data between identity systems. Typically this is SharePoint 2010 User Profiles and Active Directory (other systems are also supported).
To view the FIM 2010 interface you can open the Synchronization Service Manager, which is by default located at:


Sp 2010 :


C:\Program Files\Microsoft Office Servers\14.0\Synchronization Service\UIShell\miisclient.exe


SP 2013 :


C:\Program Files\Microsoft Office Servers\15.0\Synchronization Service\UIShell\miisclient.exe

Tuesday, November 18, 2014

AD Users not getting resolved in People Picker

Issue:- Any New User or Group created in Active Directory is not getting resolved in a specific SharePoint Site collection People Picker. It works fine for other Web Applications and if you create a new Site Collection in the same Web app, People Picker is resolving new Users and Groups there.
For the problematic Site Collection, the old Existing User accounts and Groups are resolving fine, only the New ones are not getting resolved in People Picker.


Resolution:-
Get-SPSite "http://SharePoint/sites/collection" | fl > C:\props.txt
If you open the Props.txt file, you will see the properties for this site collection. Look for "UserAccountDirectoryPath" property. By Default it should be blank, if it is not, that is causing new Users in AD not to be resolved in People Picker.

To Change the Property value to Blank, follow as below.


$Site = Get-SPSite "http://SharePoint/sites/collection"
$Val=""

Saturday, November 8, 2014

Microsoft.SharePoint.SPException

Following is code is working in console application but , it is not working in aspx page.

SPSite site = http://localhost:9292;
    SPSecurity.RunWithElevatedPrivileges(() =>
    {
        SPSiteSubscription subscription = SPSiteSubscription.Create();
       site = webApp.Sites.Add(subscription, siteUrl, title, description, lcid, webTemplate, ownerLogin, ownerName, ownerEmail, null, null, null, useHostHeaderAsSiteName); // exception
       site.AdministrationSiteType = SPAdministrationSiteType.TenantAdministration;
   });

Exception Details : 

Microsoft.SharePoint.SPException: The security validation for this page is invalid. Click Back in your Web browser, refresh the page, and try your operation again. ---> System.Runtime.InteropServices.COMException: The security validation for this page is invalid. Click Back in your Web browser, refresh the page, and try your operation again.
at Microsoft.SharePoint.Library.SPRequestInternalClass.SetSiteQuota(String bstrUrl, UInt16 quotaId, Int64 diskQuota, Int64 diskWarning, Int32 userQuota, Double resourceUsageMaximum, Double resourceUsageWarning, Boolean bForSSC)
at Microsoft.SharePoint.Library.SPRequest.SetSiteQuota(String bstrUrl, UInt16 quotaId, Int64 diskQuota, Int64 diskWarning, Int32 userQuota, Double resourceUsageMaximum, Double resourceUsageWarning, Boolean bForSSC)
   --- End of inner exception stack trace ---
at Microsoft.SharePoint.SPGlobal.HandleComException(COMException comEx) at Microsoft.SharePoint.Library.SPRequest.SetSiteQuota(String bstrUrl, UInt16 quotaId, Int64 diskQuota, Int64 diskWarning, Int32 userQuota, Double resourceUsageMaximum, Double resourceUsageWarning, Boolean bForSSC) at Microsoft.SharePoint.Administration.SPQuota.Update() at Microsoft.SharePoint.SPSite.set_Quota(SPQuota value) at Microsoft.SharePoint.Administration.SPSiteCollection.Add(SPContentDatabase database, SPSiteSubscription siteSubscription, String siteUrl, String title, String description, UInt32 nLCID, String webTemplate, String ownerLogin, String ownerName, String ownerEmail, String secondaryContactLogin, String secondaryContactName, String secondaryContactEmail, String quotaTemplate, String sscRootWebUrl, Boolean useHostHeaderAsSiteName)   at Microsoft.SharePoint.Administration.SPSiteCollection.Add(SPSiteSubscription siteSubscription, String siteUrl, String title, String description, UInt32 nLCID, String webTemplate, String ownerLogin, String ownerName, String ownerEmail, String secondaryContactLogin, String secondaryContactName, String secondaryContactEmail, Boolean useHostHeaderAsSiteName)    at WSS4WS.ProvisioningService.<>c__DisplayClass5.<CreateSite>b__0() in C:\Projects\Web Services\WSS4WS\WSS4WS\ProvisioningService.asmx.cs:line 77    at Microsoft.SharePoint.SPSecurity.<>c__DisplayClass4.<RunWithElevatedPrivileges>b__2()    at Microsoft.SharePoint.Utilities.SecurityContext.RunAsProcess(CodeToRunElevated secureCode)    at Microsoft.SharePoint.SPSecurity.RunWithElevatedPrivileges(WaitCallback secureCode, Object param)    at Microsoft.SharePoint.SPSecurity.RunWithElevatedPrivileges(CodeToRunElevated secureCode)    at WSS4WS.ProvisioningService.CreateSite(String webApplicationName, String siteUrl, String title, String description, UInt32 lcid, String webTemplate, String ownerLogin, String ownerName, String ownerEmail, Boolean useHostHeaderAsSiteName)
Though the above code snippet works perfectly fine in console application but aspx is webrequest and SharePoint handles web request differently. All the webrequest validated with the FromDigest control. To get rid-off from this error message, we can change the web application validation settings in Central Administration > Web Application General Settings Page.
image
Enjoy this will solve your problem.

Tuesday, October 28, 2014

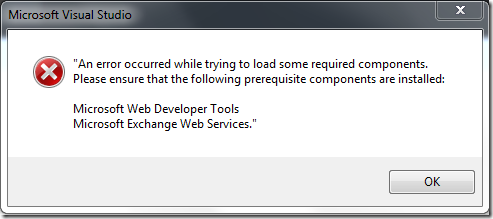
An error occurred whilst trying to load some required components, Please ensure the following prerequisite components are installed. Microsoft Web Developer Tools Microsoft Exchange Web Services”

Visual Studio 2012 provides a great environment for dev/test SharePoint 2013 Apps.
This is true both for scenarios where you want to dev/test in the cloud and then run the app in the cloud, as well as for scenarios where you want to dev/test in the cloud and then run the app using an existing on-premises environment.
If you want to create a SharePoint 2013 app and your receive the following exception, follow the next step by step guide to resolve this issue.


ewserror
  1. Close the messagebox and Visual Studio.
  2. Type appwiz.cpl in Run, this will open the Add/Remove Programs control window.
  3. Uninstall Microsoft Exchange Web Services Managed API 2.0
  4. Right click the EwsManagedApi32.msi link and use the Save link as option to store the msi in c:\downloads
  5. Navigate to c:\downloads and type cmd in the adres bar (this will open the command prompt with c:\downloads as location)


  1. Type dir and make sure EwsManagedApi32.msi is listed in the console window
  2. Type EwsManagedApi32.msi addlocal=”ExchangeWebServicesApi_Feature,ExchangeWebServicesApi_Gac”
  3. complete the installation procedure
  4. Open Visual Studio 2012 and start a new SharePoint 2013 App project.


Ref :


http://blogs.msdn.com/b/timquin/archive/2013/01/22/setting-up-visual-studio-2012-for-sharepoint-2013-development-offline.aspx


 http://leonzandman.com/2013/02/07/prerequisite-components-error-when-creating-a-visual-studio-2012-sharepoint-2013-app-project/


http://tomvangaever.be/blogv2/2013/06/an-error-occurred-whilst-trying-to-load-some-required-components-please-ensure-the-following-prerequisite-components-are-installed-microsoft-web-developer-tools-microsoft-exchange-web-services/